
In this series of articles, I will show you how to build a serverless EC2 inventory stack using the AWS CDK.
I often build AWS automation solutions that need an up to date inventory of what resources are currently running and their existing state.
It’s trivial to get a point in time inventory for EC2 instances, but the downside is I need to trigger this manually and it doesn’t refresh when changes are made.
By the end of this article you will have an inventory of your EC2 instances in a DynamoDB table that will keep itself up to date.
Serverless Architecture Diagram
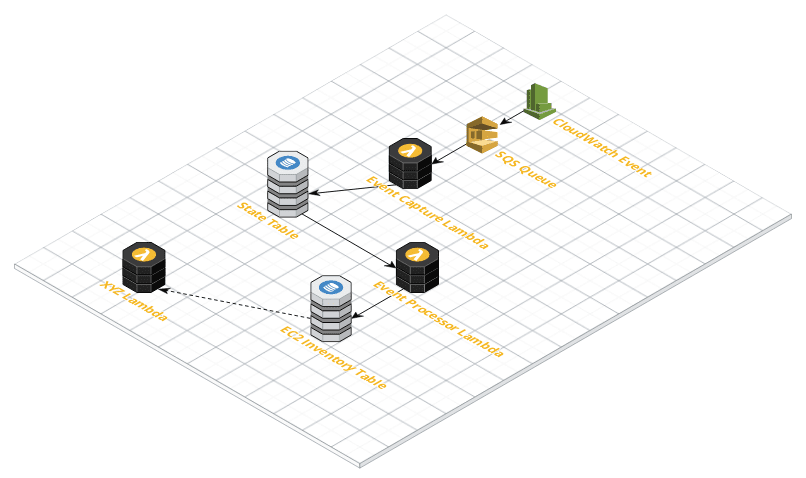
As seen in the above diagram the serverless EC2 inventory architecture stack is very straight forward, there are three key components:
- Trigger event
- State Capture
- EC2 Inventory
Trigger Event
Our application is triggered by a CloudWatch Event which is triggered any time an EC2 instance changes state to “running”, “stopped” or “terminated”. As a result we ensure we update our inventory where is a change, and in turn it keeps our inventory up to date.
Once the CloudWatch event is triggered the event is saved to an SQS queue. By using and SQS queue, we are able to process these changes asynchronously. As a result we can fairly easily deal with these changes in batches in the future.
State Capture
Next we will have a lambda function that will read the message from the queue and add the instance id, state and time the event occurred into a state change DynamoDB table.
This table will keep a historical state for each EC2 instances, which could be useful for other purposes. For instance, we may want to determine when an instance was started today or what times is the instance usually started and stopped.
EC2 Inventory
Lastly, we have the EC2 inventory which will be another Lambda function and the final output is saved to a DynamoDB table.
We will configure the EC2 Inventory lambda to trigger when there is an update to our state change table. Once triggered, the Lambda function will check if there is already an inventory record for the instance, if so it will delete it and then create a new record.
As a result, our inventory table always contains an updated inventory. This is due to the initial CloudWatch event being triggered by the “running”, “stopped” or “terminated” states.
There are a few more transitional states between those three but these are usually short lived.
Finally we will do a describe on the instance and save that output to the EC2 inventory table.
Building the serverless stack with AWS CDK
In order to define how our serverless infrastructure will look like, we will use the AWS CDK. The CDK is short for Cloud Development Kit, which for all intents and purposes is a domain specific language (DSL) for writing CloudFormation templates.
Of course it does more than just convert code in your favorite high level programming language. It will also package, deploy and roll back changes if they fail all from your local machine.
In this article we will be using the Python version of the CDK.
Prerequisites
You will need to have the following prerequisites installed on your system before we get started.
- Python 3.x (I’ve used Python 3.8)
- Node package manager (NPM)
- AWS cli
I will assume you already have these installed, if you don’t there are a plethora of guides on how to install these for your operating system.
Installing AWS CDK
Install the AWS CDK using npm, we will install this as a system wide install.
~/letsfigureout $ npm install -g aws-cdk
Verify that the CDK is working as expected, I am running version 1.32.2. Which is the latest version at the moment.
~/letsfigureout $ cdk --version
1.32.2 (build e19e206)
Now we should have a working copy of the AWS CDK and we are ready to start our project.
There is a ore comprehensive guide on installing the AWS CDK on the AWS docs site.
Creating a new CDK project
Firstly, I will create a directory where I will put the complete EC2 inventory stack code base.
~/letsfigureout $ mkdir ec2inventory
Initialize this directory as a brand new CDK project, I will be starting with an empty template.
~/letsfigureout $ cdk init --language python
Applying project template app for python
Initializing a new git repository...
Executing Creating virtualenv...
Now we have a blank CDK project, let’s activate the virtual environment and install the initial requirements.
~/letsfigureout/ec2inventory $ source .env/bin/activate
(.env) ~/letsfigureout/ec2inventory $
(.env) ~/letsfigureout/ec2inventory $ pip list
Package    Version
---------- -------
pip        20.0.2
setuptools 40.8.0
As we can see, this is an empty virtual environment with no dependencies installed.
Install the initial project dependencies.
$ pip install -r requirements.txt
We now have a working initial project, one more thing I like to do is to add the virtual environment to the git ignore file so I don’t accidentally commit it to SCM at a later stage.
$ echo ".env" >> .gitignore
Bootstrapping the CDK
In order to be able to deploy our stack, we must first bootstrap the CDK environment. At the moment the bootstrap process creates an S3 bucket, this is used to store your packages application.
$ cdk bootstrap
Deploying our Stack to AWS
Assuming you have a working AWS cli installed, we should now be ready to deploy. Of course this will deploy an empty stack, but I think it’s worthwhile doing so to ensure we have everything configured correctly.
First verify that there are no major syntax errors with the stack.
$ cdk doctor
ℹ️ CDK Version: 1.24.0 (build 6619e36)
ℹ️ No AWS environment variables
ℹ️ No CDK environment variables
$ cdk list
ec2inventory
If your output is similar to my output above then we should be good to go. Next up, we’ll deploy the stack.
$ cdk deploy
Now the AWS CDK will package our application and upload it to S3. Following that it will create a Cloud Formation change-set and then it will deploy the stack. If everything worked correctly you will see the following output:
$ cdk deploy
ec2inventory: deploying...
ec2inventory: creating CloudFormation changeset...
 0/2 | 8:53:08 PM | CREATE_IN_PROGRESS   | AWS::CDK::Metadata | CDKMetadata
 0/2 | 8:53:10 PM | CREATE_IN_PROGRESS   | AWS::CDK::Metadata | CDKMetadata Resource creation Initiated
 1/2 | 8:53:10 PM | CREATE_COMPLETE      | AWS::CDK::Metadata | CDKMetadata
 2/2 | 8:53:11 PM | CREATE_COMPLETE      | AWS::CloudFormation::Stack | ec2inventory

 ✅  ec2inventory

Stack ARN:
arn:aws:cloudformation:ap-southeast-2:0000000000:stack/ec2inventory/1cf9d300-50a2-11ea-8e4b-06494f833672
We have deployed our first serverless application using the AWS CDK as well as confirming it deploys successfully.
In the next part we will start to build out our application, by creating the two DynamoDB tables and IAM roles and policies needed.
Continue on to part 2 of this series – A Serverless EC2 Inventory with the AWS CDK (part 2).
1 thought on “A Serverless EC2 Inventory with the AWS CDK (part 1)”
Comments are closed.